Thursday, July 25, 2013

My First Gallery Photograph and a Chance to Snag a FREE 5x7

Back in May, you may remember I spoke about one of my photographs being chosen as part of an Underground Gallery in Washington, DC.  If you missed it, you can check out the posting here.

I was completely FLOORED when I got the email that my photograph was chosen.  It is the first time I've had any photo requested for a gallery.  I went to see it on Mothers Day, but they did not have the gallery up yet.  Due to all the craziness of preparations for our move, we did not make it back until Fathers Day in June.

I honestly can't put into words how it felt to be walking down a corridor filled with beautiful captures of the Cherry Blossoms in our Nation's City, and to come across my very own perspective, my very own photograph.

My Photo and I <3
ISO 3200 ~ 28mm ~ f/5.0 ~ 1/30 sec
© Corrie M Avila

The lighting was awful, I forgot to bring my tripod, the ISO had to be jacked all the way up, my hair was a mess, it was a very long day... just days before our move... but I couldn't have been happier <3

My Name!! In Print!!
ISO 3200 ~ 53mm ~ f/5.0 ~ 1/50 sec
© Corrie M Avila

If you are in the Washington DC/ Northern VA area, you must check out the Underground Gallery.  There are some beautiful and amazing photographs.  You can get there by metro (probably the easiest way) or you can drive and park in one of the parking garages (they are free on the weekends and after 4pm on weekdays).

ISO 3200 ~ 38mm ~ f/5.0 ~ 1/30 sec
© Corrie M Avila

Here is a map of the area that has the Gallery.  The red arrow is pointing to where my photograph is.  There is a really cool funky striped wall just opposite my photo.  The website of Fotowalk Underground is here.

My Photo is Featured near the Bottom Left

The Gallery will be on display until November 4th, 2013.  So even though I am no longer in Washington DC, a little piece of me is <3  

Sharing the Love

As a thank you to those who venture out to see all 150 of the beautiful photographs displayed, I will give the first FIVE people a free 5x7 of your choice (shipping included).  All you have to do is post a photograph of yourself with my Cherry Blossom Photo.  You can reply with a link to your photo below in the comments or you can post it directly onto Traveling Hearts Photography's Facebook Page.

The Chosen Photograph
ISO 100 ~ 50mm ~ f/11 ~ 1/200 sec
© Corrie M Avila

Capturing the Moment,

Corrie <3

Wednesday, July 24, 2013

A Sticky Situation

I am always on the lookout for photo frames either on sale or at thrift stores.  I can often find cute and whimsical frames decently priced at Ross or Kohls.  I purchased a frame earlier in the week for my husband's new office and was annoyed to find the sticker placed right on the glass.

ISO 100 ~ 60mm ~ f/5.6 ~ 1/80 sec
© Corrie M Avila

I knew I would be able to remove it, but it still didn't change my annoyance about the placement of the sticker.  They could have easily placed it on the back of the frame.  I have a little trick I use to remove sticky things and thought I'd share it with you.  Let me introduce you to an embosser.  I had originally purchased it for stamping (which I don't do very much of anymore).  But I've held onto it for it's dual purpose as a fantastic sticker remover.  I've used it to remove the little registration stickers on my license plate, vinyl stickers from glass, as well as a multitude of stickers from objects like the one pictured above.  If you don't have an embosser, you can also use a hair dryer (which blows air so it is a little more difficult to work with).  

ISO 200 ~ 60mm ~ f/5.6 ~ 1/60 sec
© Corrie M Avila

To remove the sticker, direct the embosser onto it and carefully start peeling away the sticker from the glass.  It does get hot so sometimes I will use tweezers to gently pull the sticker away.  If there is any residue leftover, you can use goo-gone or also I've heard peanut butter does the trick.

ISO 200 ~ 60mm ~ f/5.6 ~ 1/160 sec
© Corrie M Avila

So here you have it!  A beautifully clean removal of an obtrusively placed pricing sticker.  

Capturing the Moment,

Corrie <3


Saturday, July 20, 2013

Am I a man or a muppet?

Have you seen The Muppets?  It's a favorite in our home... (If you are on a mobile device, the video clip won't show up.... just google "Man or a Muppet"or look at the blog post on a desktop and the video clip should be there)


Lately I've been going through a lot of personal things.  Something I don't talk about very often is that I went to school for social work.  While I have worked in the field, I have not been able to attain my license due to our family relocating every few years with the military.  Our last tour I was working part-time and eventually had to leave my job completely because of our family situation.  My family always comes first and I needed to step away from my career and give my family 200%.

This was quite the blessing in disguise.  I needed something to keep me busy and that is when I picked up my camera and started to get serious about photography.  I was able to be with my family, give my youngest the special attention he needed, make all the additional appointments and yet still have a creative and fun outlet for myself.

Now it seems I am at a crossroad.  The boys are older, the previous pressing issues aren't there anymore, and we will be in one place for three years (translation ~ long enough to get licensed).

My heart is torn.  I want to do both.  I want to continue to pursue photography and get established in the area.... but I still have the heart of a social worker.  Is it possible to do both?  Yes, of course... but the way I handle tasks is to give my all.  I won't be able to divide my all three ways (photography, social work & family).  Something will have to give... something will sacrifice...

So am I a man (ahem ~ woman) or a muppet... I'm still not sure... but time will tell

Capturing the Moment,

Corrie <3

Monday, July 15, 2013

Instagram {Printing and Saving Photos}

Instagram has been one of my favorite creative tools to use while on the go with my phone.  I've gone into a more detailed description and explanation here and here if you are interested.

While I love taking and editing 1x1 {square} photos on my phone, the big question has been how to print them.  I personally use my professional printing lab, but there are all sorts of companies now that offer direct access to your Instagram photos for easy printing.  You can print anything from regular prints and canvases to sticker books, mini books, and even calendars.  One of the companies I found with the most options is Prinstagram.  But there are also printing options with InstacanvasOrigrami, Canvaspop, or Persnickity Prints.  I've never personally used any of these companies, but I do plan on ordering some stickers soon from Canvaspop.

There is an option on your Instagram account that allows you to save the full resolution photo to your device.  This is previously how I was saving and using my photos.  If you don't save your photo when you initially post it, you can email it to yourself straight from Instagram.  The downfall with this is the size of your photo ends up being about 8 KB.  Basically too small to print at all.  

This is what your Settings Screen looks like
Just make sure that the "Save Original Photos" is "on"

When you post a photo through Instagram, the resolution is already low.  I imagine this is because they are housing millions and millions of photos on a server somewhere and try to keep the photo to a minimum file size.  What does this mean?  Well, basically that the quality of your photo is good enough to print, but the print will have to be on the small side.  The Instagram printing companies seem to print as large as 20x20, but I wouldn't go larger than 12x12 (my opinion).

Now what happens if say, you have 5000 photos on your cell phone and it crashes... and the Instagram photos never got backed up?  Well, that happened to me and after my mild panic attack, I figured I would google it.  And like magic, the answer appeared (what did we do before google??).  There is a website called Instaport.  You can access your Instagram photos through this website and it will download whichever photos you choose (I chose the last 200 photos) into a pretty little file.  And the best part?  They are all the high resolution photos. :)  Phew....

Now I can print my favorite NYC Instagram photo to complete my New York City shelf.


Capturing the Moment,

Corrie <3

Sunday, July 14, 2013

Sunday Morning

I woke up this morning with my 5 year old millimeters from my face.  He proceeded to tell me he woke up because his brain told him it was time.  (Yes mom, I know this is payback from all the times I woke you up)

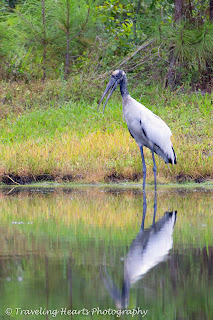
I had to PRY my eyes open... As I am grumbling to myself about how my children must have not gotten the "sleeping in" gene, I stumbled to the kitchen to make a cup of coffee.  I looked out my back window and saw a white and black bird practically in my backyard.  I grabbed my camera (knowing it probably wouldn't be there anymore) and went outside.  He had meandered down a ways, but was still there.  I wasn't sure what type of bird this was ~ first time I was seeing it.  He was skittish so I was glad I had thought to change my lens to the big daddy (my 300mm lens).  I sat down in the grass and just enjoyed watching him scooping through the water looking for breakfast.

Wood Stork Profile
ISO 400 ~ 300mm ~ f/5.6 ~ 1/640 sec
© Corrie M Avila

Wood Stork Flying
ISO 400 ~ 300mm ~ f/5.6 ~ 1/640 sec
© Corrie M Avila

After coming back inside I looked him up and discovered he is a Wood Stork.  Apparently these guys are quite skittish and are more often in secluded areas.  They are on the an endangered species list and more commonly in South America.  So with all this information, I was quite surprised that he was in the lake behind my house.  I do hope I get to see him some more and will take extra effort to keep my distance should I see him again.
Wood Stork and his Reflection
ISO 400 ~ 260mm ~ f/5.6 ~ 1/250 sec
© Corrie M Avila

Wishing you a pleasant and relaxing weekend.

Capturing the Moment,

Corrie <3

Saturday, July 6, 2013

Fireworks!!

This past fourth of July, we celebrated the freedom of our country in the good ol' United States of America.  This was also the first time I set out to photograph fireworks which can be a little tricky because there aren't many opportunities to practice.  Even after reading up on it and learning the basics, I still went into it blindly.  I put together some tips for you based on my experience and hope to help you out at the next fireworks worthy occasion.

Fernandina Beach, FL
ISO 100 ~ 95mm ~ f/20 ~ 7.0 sec
© Corrie M Avila

Tip #1

Allow plenty of time to arrive to the location and to get set up.

Reality ~ we arrived just as the fireworks were starting and ended up getting diverted to a dead end alley (where the view was pretty good), but it left me flustered trying to set up my camera, tripod, and remote while the fireworks were already going off.

Tip #2

Make sure you have a high f/stop # (small aperture).  Not sure what this is? Read up here.

Reality ~ I forget to raise my f/stop # and ended up shooting at f/5.6 for most of the fireworks.  This left me with many images I could not use because they were not crisp and the depth of field was too small.  By the time I realized this mistake the show was 95% done.  It is recommended to shoot with f/18 or higher for fireworks.

Tip #3

Even though you cannot practice shooting fireworks beforehand, you can practice with some night shooting to experiment with the bulb setting on your shutter.

Reality ~ I'm ashamed to admit I've never once used the bulb setting on my shutter before and that left me fumbling around trying to get the hang of it in the middle of the fireworks show.

Tip #4

You MUST have a tripod and a remote.  Imperative.  If you don't have a tripod or a remote, you can improvise, but it will make it much more challenging and more of a chance your photos will be blurry with camera shake.

Reality ~ I actually remembered both :)

Tip #5

Focus.  I'm sure there are several ways to do this, but this is what I ended up doing and it worked pretty well.  I used auto focus while a firework was exploding and then flipped my lens onto manual.  That way the camera was not looking for a focal point each time.  For the most part, fireworks are set off at the same spot, so your focal distance should not change.

Reality ~ I tried to straight up manually focus and couldn't do it.  The way I just described is what worked best for me.

Fernandina Beach, FL
ISO 100 ~ 85mm ~ f/5.6 ~ 5.0 sec
© Corrie M Avila

Summary

Have fun!! Be creative!!  There is no "right" or "wrong" way to photograph fireworks.  By the end of the display I got the hang of what my results looked like when I did different things and began to plan when I would open and close the shutter.  This photograph is by far my favorite of the evening creatively speaking.

Fernandina Beach, FL
ISO 100 ~ 100mm ~ f.20 ~ 6.0 sec
© Corrie M Avila

Look in your local paper and local "happenings" because there are often fireworks during other times too.  I read that there is a local shrimp festival here in Fernandina Beach that also hosts fireworks.  Next time I'd like to try out these methods by Photographer David Johnson.  The results are creative and resemble Chihuly blown glass (to me at least :)

Capturing the Moment,

Corrie <3

Tuesday, July 2, 2013

Manual Tutorial #7 {Wrapping Up}

If you have just stumbled across this Tutorial for the first time, it would be a good idea to start at the beginning here.

Manual Photography {Wrapping Up}

Now that we have covered all the different components of exposure and how to shoot in manual ~ it is time for you to use what you have learned.

I wanted to share with you a great tool to print or copy.  Photography Field Guide ~ This is super helpful and a cheat sheet of sorts to use while you are out with your camera (and not near books, wifi, or internet)

General Walkthrough of How I Typically Shoot

#1) First I think about my ISO...

  • is it cloudy? (higher ISO)  
  • is it sunny? (lower ISO)  
  • am I shooting indoors? (much higher ISO)  
  • will I need a tripod? (lower ISO but will cause a slower shutter as well)  
  • do I care about grain (higher ISO)?

#2) Next I ask myself what is most important to my photograph?  Shutter Speed or Aperture?  Whichever is most important to your photograph, adjust that one first.

  • If Shutter Speed
    • Freezing Movement?  -> Fast shutter speed
    • Blurring Movement?  -> Slow shutter speed
  • If Aperture
    • Blurred Background -> Large Aperture -> Small f/stop # (ex f/2.8)
    • Crisp and Detailed Background -> Small Aperture -> Large f/stop # (ex f/16)
Example

I took this photo while I was having my morning coffee on my balcony.  This was the last morning I had in my Virginia home before the packers came and our move to Florida started.  The sun was rising behind the trees and I knew that if I used a small f/stop number (larger aperture) I would be able to create bokeh with the sunlight (blurred out of focus orbs of light that occur with a small f/stop number).  

It was still on the dark side, so I set my ISO to 200.  I then set my f/stop as low as it would go with the lens I was using (happened to be f/5.6).  From there I just adjusted my shutter speed until my cursor was at the "0" hash mark.  (Remember the light meter?)  

I especially like this photo because it captures the emotion of my last morning coffee.  I also loved that the bokeh looks like little sparkles coming out of my cup <3

ISO 200 ~ 53mm ~ f/5.6 ~ 1/400 sec
© Corrie M Avila

Can you understand the settings below my photo now?  Does it make sense?  The only thing we haven't gone over is the second number and that is your focal length.  Basically just the distance your lens is set to.  On a telephoto lens it will change, on a fixed lens, it will remain the same.  This is more of just documentation and does not have anything to do with shooting in manual.  Knowing that the lens was at 53mm, you would know that I was standing pretty close to the mug.

Some Final Tips and Reminders

* Don't forget that all three components (ISO, aperture, shutter speed) interact with each other.  When you adjust one, it affects the rest.  Remember the graph from early on in the tutorials?

* If you are having trouble knowing where to start, put your camera in "P" mode and see what the camera says the settings should be.  That is a good starting place until you get more comfortable finding your settings from scratch.  But don't forget to switch back over to Manual so that you have the control!

* When learning Manual Photography, go easy on yourself and practice on something that does not move ~ you will have a much easier time shooting and can just focus on the camera rather than the subject running away :)

* Finally, to avoid photos that are blurry from your hand shaking, do not go slower than 1/60 sec on your shutter speed without a tripod.  If your settings are telling you that you are slower than that, it is time to bump up your ISO a bit or lower your f/stop number (aperture).

I've already gotten some great feedback from this tutorial series and I'm excited to hear from you!!  Has this helped you?  Do you still have questions?  Please reply to this blog post with your questions/comments and I will put together a follow-up blog post answering them.  I know this is a hard concept to get and to wrap your head around, but I promise, keep working at it and you WILL begin to understand!

Capturing the Moment,

Corrie <3
Monday, July 1, 2013

moving, loving, and cherishing

Military transfers are hard in many ways.  I've talked about some of that in my previous blogs here and here anddddd here....

But I wanted to change it up and talk about one of the positive aspects of a military move.

Fernandina Beach, FL
(iPhone photo)
© Corrie M Avila

A typical military family endures many separations due to deployments, duty shifts, or just the regular demands of the job.  But during a military move (PCS) there is often the ability to take some time off in between jobs.  It sort of recharges the military member as well as the family.

my two littles
Instagram Photo
© Corrie M Avila

Yes there is the normal moving stuff that goes on.. unpacking, reorganizing, traveling, ect.... but there is also time just spent with the family.  Sort of like hitting the pause button on life for a bit.

one of our "waiting days" in the new house
ISO 800 ~ 33mm ~ f/5.0 ~ 1/40 sec
© Corrie M Avila

We are settling in nicely to our home... watching for lizards, listening to the rain, walking on the beach, searching for shark teeth and most importantly just being together.

magnolia bloom from my front yard
Instagram Photo
© Corrie M Avila

Capturing the Moment,

Corrie <3